
Hey guys! In this episode, I take the girls on an adventure to find some letterboxes! Letterboxing is a global game of treasure hunt and also a Brownie Girl Scout badge!! Check your area or the area you are traveling to for this fun adventure!
Posts tagged #Brownie badges
Resources and Ideas for Space Badges
We have a troop that consists of 4 daisies, 6 brownies, and 11 juniors. It’s a healthy size troop and while our meeting room perfectly accommodates us, working as a large group on one activity at a time is never successful. That’s when attention issues surface at their finest and girls get bored. A solution to this problem is breaking the troop up into smaller groups and having them rotate activities. You might want to incorporate patrols into your troop organization for this reason.
Kid’s First Aid Kits
A couple years back I crafted these cute little kits for the girls in my troop. We were planning and preparing for a camping trip and earning our Brownie First Aid badge. These are perfect for GS but also any little kid who likes to feel a little independence. Lets be real, what kid doesn't like playing with band aids?
Brownie Designing Robots Part 2

If you are just joining us, we previously completed Part 1 of the Brownie Designing Robots badge! We broke the badge into two meetings because it really does require that much time if you are focused on what they are learning and not just completing the badge.
We searched and searched the internet to find an easy and affordable robot idea for the second part of this badge. It can be hard to find the right supplies but you're in luck, we have included them for you in this post!
Create your prototype
The idea came from a fantastic tutorial on bristlebots. You can find the tutorial here: http://www.instructables.com/id/Bristlebot-1/ They do a great job of explaining and providing pictures along the way.
What you need:
- Wire stripper
- Scissors
- garden shears
- toothbrush
- double sided foam tape
- vibrating motor
- small battery Caution!!! Do not let little children swallow these.
- googly eyes
- pipe cleaners
Before the meeting:
Before your meeting, you will want to cut the toothbrushes down with your garden shears. You will also want to prepare the motors by stripping about 1/2 inch off of the end of each wire with your wire stripper. I also separated the materials into ziplock bags for each girl so distribution during the meeting would be easy.
We started the meeting explaining what we were going to do and then we showed the video below to the girls. We always have great success with video media and the girls' attention span!!
We then handed each girl a ziplock sandwich bag with all of the supplies they would need to create their bots.
With the instructables website up on the projector screen (or you can print it out), we did each step together.


Debug
Oh were there bugs!!! Not just Bug Bots, but obstacles with constructing and getting them to work. But ya know what? That is the purpose of the last step!! Trial and Error. Isn't that what engineering and life is all about?
The bug doesn't work?
Here are a couple ideas to troubleshoot a bot that doesn't work...
- There is an object (probably a finger or googly eye) blocking the motor from spinning
- the wire attached to the foam tape is submerged into the tape and is not conducting electricity
- The wire is not properly touching the other end of the battery.
And there ya have it! You have successfully completed the Designing Robots badge!!! I hope you found this section helpful and if you are looking for Part 1 you can find it here: Designing Robots Part 1. Leave us some love in the comments below and let us know what you would like to see next!!
Brownie Designing Robots Badge Part 1

I was super excited over the summer when they announced the new S.T.E.M badges. We have been trying to incorporate more S.T.E.M activities in our home for the girls. Last year we got the girls the Dash robot for Christmas and they seem to genuinely have an interest in the programming fun.
When the requirements for the badges came out, I have to admit, I was a bit confused. I must have reviewed the Volunteer Toolkit way too many times and then I realized, like with most of the resources offered, they always seem to be lacking creativity and visual explanation. So, I took to trusty Pinterest to assist with my research and planning.
Here is Part 1 of the Designing Robots Brownie Badge. I do recommend doing this in 2 meetings. It's A LOT and not a badge I would try to cram into one session. They won't take away much if you rush it and that defeats the purpose, right?
Robots Imitate Nature
I was so not a fan of the video recommendations on the VTK. My girls have such a short attention span so anytime I show a video it needs to be engaging! Here is a great substitute that also reinforced their Daisy Flower Garden Journey they completed last year (in case you are a multi-level troop)
Different Robot Parts
For this step, the girls partnered up. Each pair got a marker and a sheet of blank paper. One partner was given an example and they had to pose like a robot. The other partner had to draw what a robot would look like in that pose. Example of a pose: Robot playing basketball.
Each person was given a chance to pose and draw/ We discussed the different examples of robotic parts they used in their drawings.... joints, gears, levers, pulleys, wheels, sensors, etc.
The girls went on to build their own robotic arms to further explore how robots are like humans and biomimicry. They built arms that could both extend and grab an object.
We lightly taped white lunch bags (filled with little prizes) to the wall for our mystery bag challenge! We taped them slightly above the girl's reach. To my surprise, the extender arms worked (for most)!!! This activity was a suggestion from the VTK. I liked the idea of building the robotic arms but their explanations and materials list left me so confused. There was no direction or suggestions on how to build, just a list of materials to let the girls explore. Now, I know we want to keep it Girl led but my girls could play with a box of the supplies all day and still be confused. So I needed to create an example for them.
Extender Grabber
So this prototype took ME about 10 minutes to make which means the girls needed a solid 30 minutes to do it themselves.
Materials:
- craft sticks (NOT the jumbo kind)
- Shake straws (NOT regular straws)
- tape
- toothpicks
- scissors

First, you will want to make 4 sections like this...

You will need two craft sticks, two 2 inch pieces of straw, and duct tape. Insert the end of a craft stick into the straw piece slightly less than halfway. Insert the other craft stick into the opposite end of the same straw piece. Leave a gap between the two craft sticks to allow for a toothpick hole. Secure craft sticks and straw bits with tape. Take your other straw bit and insert it into the open end of one of your craft sticks just short of halfway. Again, leave just enough room for a toothpick hole and secure with tape. Do this 4 times.
Next
Create your joint by taking one of your sections and punching your toothpick through the center of your straw piece. Take the second section and punch a hole with the same toothpick from your first section to overlap the two sections to make an X.


Take your two remaining sections that you have not used yet and attach them to the opposite straws bit (circled in picture below) using the toothpick punching method.

To finish your extending grabbing arm...
You will want to create something that resembles pinching/fingers. I cut a craft stick in half and attached each half to the end of an open end craft stick with tape (see the bottom half of the picture above).
The extender grabber is now finished and at this point, you can have your girls test it out and troubleshoot areas for improvement. They might need more stability(tape) in an area. Have them play around with the arm and try the mystery bag challenge!


Plan out your Robot
Once the girls understood the different parts of a robot and how they can make one actually work, they got to brainstorming ideas for their own prototype. We discussed simple projects or tasks that would be helpful to have a robot do.
Suggestions:
- Feeding a pet
- retrieving a newspaper
- Picking up dog poop (LOL)
- Moping the floor
- Taking out the garbage
- Tub scrubbing robots
- Trash picker upper
We decided to do the tub scrubbing robot. We found a helpful video online and the girls planned out the materials they would need. Next meeting the girls will have an opportunity to make the robots!
This concludes part 1 of our Designing Robots badge. Here you can find part 2 of the badge with our scrub bots!!!
Designing Robots Part 2
Don't forget to comment below and share what your troop did for the designing robots badge!!
Mini Bagel Pizzas

Today I'm excited to share with you a super easy snack that even your littles can put together. We used this idea for the brownie snacks badge and the girls loved it. There are so many ways to use this recipe!
- Brownie Snacks Badge
- After school snack
- Pizza lunchable
- Camp recipe (with box oven)
What you need:
- Mini bagels
- pizza sauce
- mozzarella cheese
- spoon

Instructions:
- slice the bagels in half (open face). Try to get a brand that has them pre-sliced to make your life easier.
- Spoon 2 spoonfuls of sauce on each half and use the back of the spoon to spread.
- Sprinkle cheese on top!
- If you want to take it a step further you can pop them in an oven at 350 degrees for 8-10 minutes.
These make a great after school snack or you can pack the components in their lunch for a pizza lunchable. I would recommend getting the little cups to put the sauce and cheese in. When we did this with our girl scout troop I had the sauce and cheese divided into these cups for them to make it slightly more organized. You can also store the cheese and sauce cups in your fridge so the kids can help themselves.

Brownies: Making Friends Badge

Hello! Welcome back! Today we are covering the steps for the Making Friends Brownie Badge. I personally think this is an excellent badge to cover at the start of the scouting year! It gives the girls a chance to get to know any new girls in the troop. It's also a great "ice breaker" for the year.
Make friendly introductions
- Have the girls practice introducing themselves to each of the girls. Have them pretend it's their first time meeting and share their names and one interesting thing about them.
- Use a large bounce ball or beach ball (from Dollar Tree) and write fun questions. Start by passing the ball, when the girl catches it she can say her name and read aloud and answer the question that is facing her. Check out this site for more details.
Show friends you care
- Emoji swaps for friends (this one is my fav!)
- Write a pen pal letter about why you enjoy being friends with someone

Share in favorite activities
- Have each girl write on a piece of paper their favorite activity or game. Fold them up and put them in a hat and have them guess which activity belongs to which girl. After you have gone through them all save time to play a few games.
- Go fish
- Eye Found it card game
- Jump rope
- musical chairs
- Have each girl write on a piece of paper their favorite activity or game. Fold them up and put them in a hat and have them guess which activity belongs to which girl. After you have gone through them all save time to play a few games.
Learn how to disagree
- Friendship skips: Have the girls break up into small groups (2-3 work best) and act out scenarios on how to be a good friend and handle conflict. We bought these cute turtle craft foam kit. The girls got to decorate their own turtle and attached them to sunglasses and used them with their skips as puppets. They were turtle "scouts". You can also attach them to wooden craft sticks if you don't have sunglasses.

Skits are a fantastic way for girls to express themselves and build courage in their voice. The girls have a ton of fun with them too!
Practice friendship
- Visit a park and have the girls practice introducing themselves to the other kids. Get a game of tag going with other friends at the park.
- Consider creating a buddy bench at school
- Have the girls create and sign a Friendship Pledge". Include in the pledge. Examples of what to include could be: I will befriend the new kid in class, I will include everyone on the playground....
For more Brownie scout ideas check out our Brownie page here!
Brownie Snacks Badge
This was a fun badge to work on because what kid doesn't like to eat? I find that my troop is always hungry regardless of what time our meeting is so snack time is a great motivator and mood booster! Rather than spending an entire meeting pigging out on snacks we decided to break this badge up and have one snack each meeting.
- Jump into the world of snacks
- Visit a Farming CoOp- visit Cabot Cheese for some program ideas and how you can earn a free patch!....
Brownie First year and Bridging Certificates!
Perfect for your end of the year party or court of awards! These are available for free to download through our Mighty Girls Rock Community group on Facebook! Just look under the "files" section. Come join us!
Brownie Pets Badge
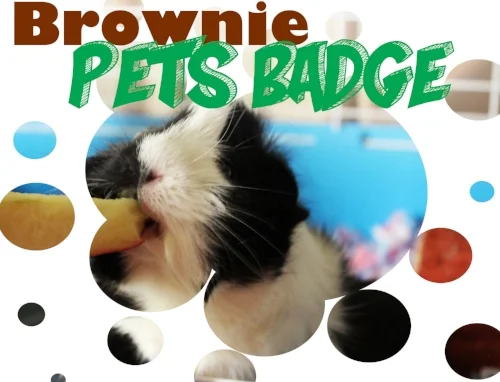
This was a pretty popular badge with the girls and their first choice when they voted on which badges to work on. I think they all thought we would get a troop pet...lol While I considered the idea, the work and organization that would need to go into that seemed more than I wanted to invest for one badge. It's still on the table as the girls keep asking. Maybe a hamster:)
Here are some suggestions for completing the steps.
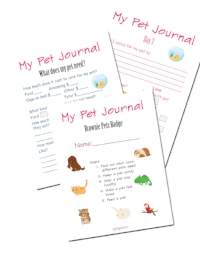
Pet Journal
At the beginning of the meeting I passed out the pet journal to each of the girls. They were to complete this at home and if they didn't have a pet they could used a stuffed animal. This is a great activity to have them follow up with what they learned and take ownership.
You can find the pet journal here--->> Pet Journal <<---
Step 1 Find out what care different pets need
- Make a collage. Make a welcome home kit for a specific animal. Use magazines or online pictures to put together a collage of what your pet would need the first day home. You can also use pet store sale ads.
- Have girls bring small pets (if they have any) to a meeting and share how they care for them. We had a girl bring in all her frogs, lizards, and a bearded dragon! They got such a kit out of it!
- Put on a pet fair! Have the girls pick a pet and create a presentation board.
- Field Trip Idea: Take a visit to a pet shop and calculate the costs.
Step 2 Keep a pet comfy
- no-sew pillows (fleece tie pillows)
- Clean out a small animal/fish tank (check with your scouts to see who has small animals for pets)
- Field Trip: Visit a local farm or barn and clean out the barn or stalls
Step 3 Help a pet stay healthy and safe
- Field trip: Visit a pet hospital.
- Build a small pet obstacle course. We also used the suggestion from the VTK and made mini obstacle courses for small pets. You can use items from around the house: construction paper, clothes pins, pipe cleaners, toilet paper rolls, ect. The girls really enjoyed this activity!


Step 4 Make a pet feel loved
- Braided sock ropes: For this step our troop created pet toys!! We "used resources wisely" and took old socks (mismatched or holes) and cut them up to make braided dog toys. The girls each brought in three socks. While the meeting started I had one adult volunteer cut the socks in half to double the length.
Step 5 Feed a pet
- Make a feeding schedule for a pet.
- Dog treats: There are plenty of dog treat recipes on Pinterest through a simple search. I've included a few for you below and a peanut free option!